Crop marks and bleed
I expect you’re aware with the concept of bleed — essentially printers print your pages on oversize paper and cut them down to size. If you have colour or an image at one or more edges of a page and you send the file at its finished size, the printer only has to be a fraction of a millimetre out with the trimming to give you an ugly thin white line around the edge. Hence the property of bleed — you send an oversized image to give the printer a bit of leeway when it’s trimmed to size.
How much bleed depends on your printer — typically they request 3mm or 5mm. It’s a good idea to check this before you start your project as it saves time later.
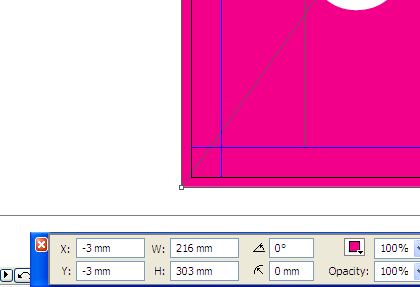 Here’s a screengrab of a coloured area at the left-hand edge of an A4 landscape page. The black edge is the page edge and you’ll see that the magenta box is overlapping (bleeding) over each end.
This is easy to achieve using the control panel. To do 3mm of bleed overall, draw a picture box anywhere and set both the X and Y co-ordinates to -3mm. As the page is A4 (297x210mm), it needs to have 6mm added in both dimensions so it bleeds over all the edges. Therefore, the width and height measurements are set at 216mm and 303mm. If you need 5mm of bleed, the X and Y co-ordinates would both be -5mm and the size of the box would be 220x307mm.
Crop marks
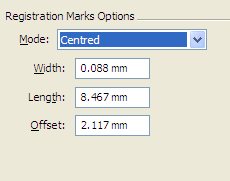 When you output the file using the method described on this page, you’ll be presented with the ‘Marks’ series of options. The good news is that, if you’re using standard bleeds of 3mm or 5mm, you generally don’t have to worry about changing the defaults — just select ‘Centred’ for the mode. (There’s also a mode called ‘Off-centred’, which I’ve never used — one day I’ll find out what it’s for.)
I’m mentioning this only because I once had to output a cover for a hardback book at a specialist printer, who requested 20mm of bleed. After a lot of fiddling about, I realised the essential principle is that the length of the marks must always exceed the bleed. The width of the marks and the offset (the distance between the edge of the image and the edge of the page) stay the same.
Bleed options
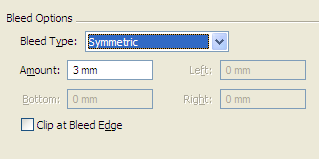 For a print job, in the Bleed options, you will nearly always want to select the ‘Symmetric’ type (i.e. the same on all four edges), then enter the amount of bleed in the box. Leave ‘Clip at Bleed Edge’ unchecked.
If you’re also doing a web version, however, you don’t want any crop marks and bleed. In this instance, turn off the crop marks in the Marks box, set the bleed amount to zero and select ‘Clip at Bleed Edge’.
Leave a Reply