Bullet points in QuarkXPress
For reasons that have long escaped me, QuarkXPress has no automatic method for making bullet points (or numbered lists for that matter). There’s no magic button, as in MS Word, that gives you an instantly formatted bullet point that’s easy to customise.
If you’re importing text from MS Word (Word 2003 at least) using File>Import Text, your bullet points will disappear. The way I get around this is to follow the steps outlined on this post and this one. This also assumes your MS Word document is built on styles and you have set one up for bulleted lists.
Once your text is in QuarkXPress, you can then change the bullet character using Find/Change and deselecting the Ignore Attributes box — this allows you to change the font, colour and character. Because I produce mostly text-based publications I’m quite conservative with bullets, using solid squares and circles, but it’s a matter of personal choice.
Formatting your bulleted lists
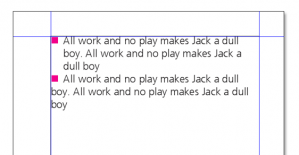
There are essentially two ways to format bulleted lists; with a hanging indent and without. Again, it’s a matter of personal taste — hanging indents (the first example) look more distinct in my opinion, but if you’re typesetting to very narrow columns, non-hanging indents might be more appropriate.
To make the hanging indent, as in the first bullet point, edit your style and go to the format box. In the Left Indent box, enter a positive measurement; in the First Line box, enter an identical negative measurement. In this example, I used values of 5mm and -5mm.
For the non-hanging indent, you simply have to enter a single figure in the Tabs box (again, 5mm).
To make a subordinate bullet
I still find this non-intuitive, but the method is simply to double the value of the Left Indent. If I needed a subordinate bullet for the hanging indent on this example, I would use a value of 10mm for the Left Indent and -5mm for the First Line.
More bullet point tips
Instant bullets
There is an alternative to the method described above, which might be useful if you’re doing your composition in QuarkXPress rather than MS Word:
- Type Alt-Shift-8 to bring up a circular bullet (Option-8 on a Mac)
- Press the tab key once and then enter Ctrl-Z (or Option-Z). This gives you a hanging indent.
- Adjust the size of the hanging indent using the Tabs box.
Images as bullets
It is possible to use an image as a bullet point. The basic principle is to draw a (small) picture box on the pasteboard with the object tool and then import an image into it. Press copy (or cut), switch to the content tool and then paste it into the text. You will have to experiment with the size of the picture box so as not to affect the line spacing.
Insert a single symbol from the keyboard
Although this doesn’t seem to work on all versions and platforms, for a single Zapf Dingbat character (if you have it installed), press Ctrl-Shift-Z (or Cmd-Shift-Z on a Mac) then type a character. For a Symbol character, press Ctrl-Shift-Q (Cmd-Shift-Q).

There is another way that I prefer… in QuarkXPress, with your cursor selected AFTER your bullet point and BEFORE your text, you can also hold down Ctrl and press the vertical line(|) key (usually found next to the return/enter button). This will do the same thing.
Peter, your method is by far the easiest that I have found. Thank you, and thank you to theonemanpublisher for this informative site.
YOU ARE A GENIUS!
Personally, I hate working in Quark 10. Just one little reason – I create flyers and handouts at UCLA, and they like bullets here. Not just bullet lists, but having a bullet in the middle of a line – separating two phrases.
I have been going out of my mind tonight trying to find out how to simply make a stand-alone bullet in the middle of a sentence. Horrors! The maniacs at Quark, obviously major anti-social types, don’t think the bullet deserves an intuitive spot where they would be easy to print in a line. Nooooooooo. But you have saved me tonight – here I’m still at work, 9:24pm, and after an hour of searching, I came upon your celestial site. Thank you!!